Your DIY Guide to Modern Well Pump Installation
Key Takeaways:
- The following text explains different well pump types and their appropriate applications for deep or shallow wells.
- The installation process will become faster and interruptions will be prevented when you prepare all necessary tools and materials beforehand.
- Your safety needs to be your top concern because it protects both your well-being and your investment throughout the installation process.
- Regular inspections combined with proper maintenance will extend both the lifespan and efficiency of your system.
Introduction
Domestic water supply reliability requires a well pump installation, which is just one of the processes necessary in order to have a constant water supply. If you are aware of the whole process, it will save time, money, and your patience when resupplying your current installation or installing one for the first time. This whole guide encompasses all necessary phases to walk you through performing the project confidently. If it’s your first time when performing this type of work or if you’d like to try professional services or if you’d like to feel more assured, there’s more that you can learn about correct pump installation by experienced experts. Our whole walkthrough informs DIY fanatics about correctly completing the job and when professional services are necessary.
Types of Well Pumps
The selection of an appropriate well pump depends on your particular needs to create a reliable water supply. The two distinct pump types in domestic well systems operate at different depths to serve various purposes of well water systems.
The design of submersible pumps allows them to function optimally in deep well operations by extracting water from the surface while underwater. The pumps run quietly while generating high water pressure output and need only occasional maintenance when installed correctly. Jet pumps function best in shallow wells because they provide easy service access and achieve their highest performance at depths below 25 feet. The operational sounds remain audible but the installation process remains easy and maintenance stays uncomplicated even in low water depth situations. The selection of a pump requires knowledge about well depth and predicted household water consumption because improper choices will result in water pressure problems and higher energy costs and shorter pump life.
Tools and Materials Needed
Having appropriate work supplies and work materials available at the installation site is necessary for good installation work. To conduct regular installation, one should opt for the right kind of well pump, PVC or galvanized pipe, special pipe connectors and fittings, rugged electrical wiring, pressure tank, torque arrestor, rugged cable for lowering submersible pump, pipe wrench, pliers, wire stripper, rugged electrical cutters, electrician’s tape, Teflon tape or pipe thread sealant, multimeter for checking for safe wiring and correct voltage, and work protection equipment like gloves and goggles. Keeping all work supplies and tooling available at the installation locality increases efficiency and reduces installation hazards. With appropriate work supplies and equipment, one can conduct a safe and efficient installation.
Safety Precautions
The importance of safety cannot be stressed enough when installing a sound pump. Multiple operations require electricity use and deep well access and heavy component handling which can be safely managed through proper precautions. These best practices must be followed at all times:
- All electrical tasks require power shut down at the main breaker panel followed by breaker locking to prevent accidental re-energization during installation.
- Protective work gloves and safety goggles should be worn because they prevent contact with electrical hazards and sharp pipe edges and shield your eyes from chemical cleaners and spray or debris.
- A stable ladder or scaffold should be used for overhead work or accessing the wellhead at height instead of unstable boxes or ladders.
- Check electrical circuits using a multimeter after power shutdown to ensure there is no voltage present.
These safety measures provide a secure installation process and defend both you and your equipment from avoidable injuries as well as expensive equipment breakdowns.
Installation Guide
1. Check Your Well
To start your project, describe your well’s depth and diameter measurements and water table elevation because they define pump position specifications and system demands. Verify local building agencies and your well-drilling contractor for permit, construction, and code-of-law data which will ensure well-pump-hardware compatibility.
2. Prime the Pump
There are also two principal ones which must always be present for purposes of ensuring that there is always a smooth running for the submersible pump: a proper descent and removal safety rope or cable and a stabilising torque arrestor for the pump. Waterproof splicing kits in their total sealing for joints must also be in all systems for purposes of inhibiting corrosion deterioration. Installations for jet pumps will also require their pump base be fixed on a hard base for purposes of minimising vibrations. Suction line connection to well water line must then be followed through before one attaches that of the upper fitting to that of the pressure tank inlet or building water system.
3. Install the Piping
Your well piping is to be made in accordance with your design specifications with all the connections in the proper position for proper function. Every thread joint must be treated with Teflon tape or equal thread sealant as tiny leaks can decrease pressure and diminish the performance of your system. Examine all pipes, valves, and couplings for proper smooth threading and cracking prior to assembly.
4. Lower the Pump (Submersible Only)
An attendant will help bring down the submersible pump on the well casing, which will be filled with electric cables and lifeline rope fully extended and unfurled.
It also needs to be installed 10-20 feet or more above the bottom of the well so as not to attract dirt that will clog parts and destroy the impeller or motor.
5. Electrical Connections
Directions for electrical wiring are also supplied by the pump manufacturer, which are to be strictly followed for wiring for main power, controller, and pressure switch/ sensor. Use connectors rated for wet/ buried applications only and keep all cable runs smooth and free from sharp bends or pinch points. Ensure all terminals are tightened in place securely before re-connection of power to the system.
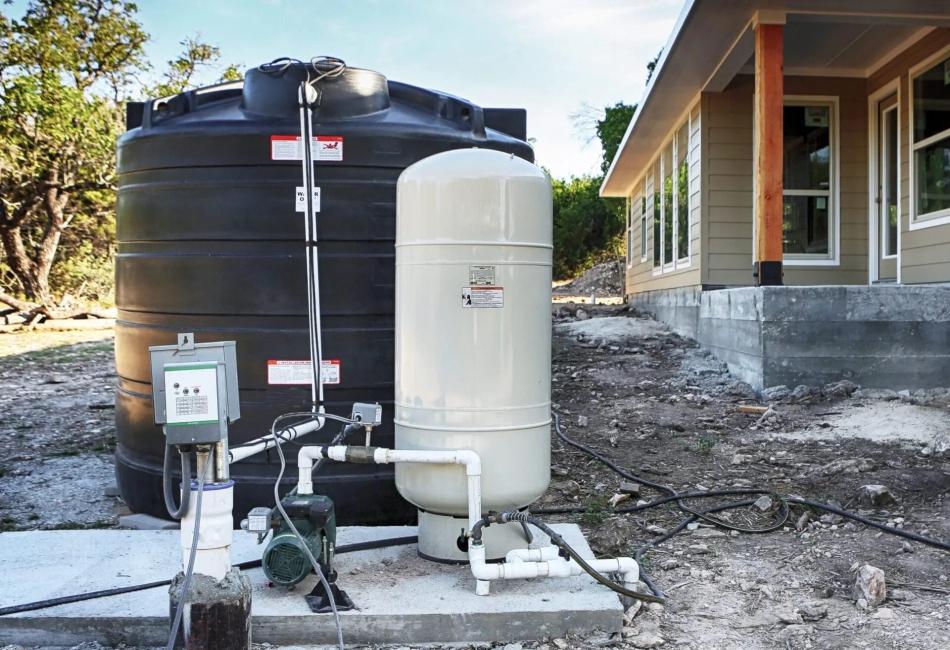
6. Install the Pressure Tank
Pressure tank must be installed on leveled ground at a point relatively close to where the pump is installed. The tank’s installation must be according to its specified setting because it is a residential area’s water pressure controller which minimizes pump life decrement as per high frequency rapid cycling.
Testing and Maintenance
Start the pump operation at a slow pace to monitor its first operational cycle. The inspection for leaks must be performed on the complete pipe assembly and valve joints before tightening any loose fittings. The system produces knocking sounds and rumbling and unusual sounds which indicate that air or debris has become stuck. A good, well-pump trouble-shooting guide needs to be consulted when dealing with ongoing problems. The pump, pipes and pressure tank’s regular operations require leak checking and inspections of rusty and moving elements. The annual combination of pressure tank air charge testing with sediment flushes prevents system clogging. System professional tests should run periodically every few years to detect early warning signs of problems that protect valuable investments.
When to Call a Professional
The installation of a well pump works for residential homes, yet there are particular cases where professional help becomes necessary. Obtain a certified technician if:
- Your well descends beyond 150 feet or has a tiny outlet that requires special lifting equipment which goes beyond ordinary DIY reach. Your current level of expertise and confidence does not allow you to perform complex electrical work such as diagnosing and repairing control boxes and circuit systems.
- The installation problems persist after following standard troubleshooting procedures because of ongoing low pressure issues and unpredictable pump operation and unexplained power outages.
- The combination of expertise with protection equipment and licensing qualifications enables fitters to handle complex installations while detecting hidden problems that homeowners typically overlook.
You should seek professional help for major problems because they will protect your valuable property and your family’s health and your home.
Your water system will operate dependably for several years when you understand basic well pump technology principles, execute proper installation procedures, and recognize your technical limitations. Whenever you need help, seek assistance from experienced professionals. The Home Depot, together with similar professional sites, provides complete resources for individuals who wish to establish a reliable water supply through this DIY approach.


