What to Expect During a Professional Roof Inspection: A Homeowner’s Guide
A roof inspection is one of the most important maintenance steps homeowners can take to protect their property. While the roof may appear in good condition from ground level, there are often hidden issues that can go unnoticed until significant damage occurs. Scheduling a professional roof inspection provides a proactive approach to identifying problems early, extending the roof’s lifespan, and ensuring the safety and structural integrity of the home. Whether it’s required for insurance purposes, a real estate transaction, or routine upkeep, understanding what takes place during a roof inspection can help you feel more prepared and informed. We will explore the key steps involved in a professional roof inspection and what you should anticipate throughout the process.
Understanding the Roof Inspection Process
1. Initial Consultation and Exterior Assessment
The roof inspection process typically begins with a brief discussion between the inspector and the homeowner. This conversation clarifies any concerns you might have, such as prior leaks, visible sagging, or water stains on ceilings. The inspector may ask about the roof’s age, previous repairs, or storm damage. Companies like Rocky Mountain Roofing and Exteriors often begin their inspections with this step to ensure they fully understand the homeowner’s concerns. Following this consultation, the visual inspection begins from the ground, utilizing binoculars or drones to obtain an overall view. This stage involves evaluating the visible components of the roof from the outside: the shingles, flashing, gutters, vents, chimneys, fascia, and soffits.
The inspector looks for signs of aging, such as curling, missing, or broken shingles, as well as damage caused by wind, hail, or pests. The condition of gutters is also reviewed to ensure water is draining properly. If the inspector notices sagging or pooling, these could be signs of poor drainage or underlying structural issues. This exterior evaluation sets the tone for a more detailed, hands-on inspection.
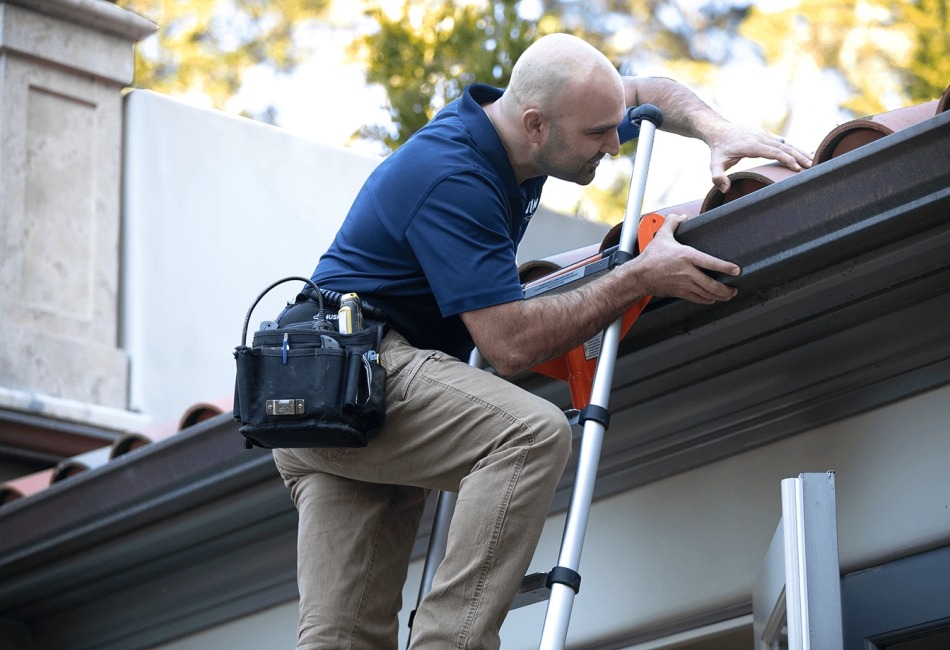
2. Climbing the Roof and Close-Up Inspection
Once safety protocols are in place, the inspector climbs onto the roof for a more thorough examination of its condition. This is where the most telling signs of damage are often found. The inspector checks for granule loss on asphalt shingles, cracks in tiles, rust on metal panels, or loosened fasteners. They will also assess flashing, which protects joints and transitions, such as those around skylights, vents, and chimneys. Poor or deteriorated flashing is one of the most common sources of leaks. Roof penetrations are examined to ensure a tight seal, preventing moisture entry.
Additionally, the inspector verifies that all ventilation systems are functioning correctly, as poor airflow can lead to heat buildup or moisture damage inside the attic. While walking on the roof, they assess structural firmness—if it feels spongy, there could be hidden rot or damage to the decking underneath. Photos or notes may be taken to document findings.
3. Attic and Interior Inspection
A thorough roof inspection also includes an evaluation from the inside, typically starting in the attic. This interior inspection is critical because many roof problems begin beneath the surface. The inspector looks for signs of water infiltration, such as mold, mildew, or discoloration on the wood framing or insulation. These indicators often point to a leak that has been active for some time. The attic’s ventilation is reviewed to ensure adequate airflow, which helps prevent ice dams, condensation, and warping.
Any daylight visible through the roof boards is a red flag, showing gaps or holes that need immediate attention. In addition to the attic, the inspector may check interior ceilings and walls for water stains, bubbling paint, or peeling drywall—clear signs that moisture has breached the outer roof. The goal is to identify both active leaks and areas at risk of future failure. This dual approach—inside and out—ensures the inspection captures the complete health of the roofing system.
4. Documentation and Detailed Reporting
Following the physical inspection, the inspector compiles a report outlining the condition of your roof. This document is typically detailed, including written notes, photographs, and diagrams. It outlines existing issues, potential future concerns, and recommended actions. For homeowners, this report is valuable for making informed decisions about repairs or replacements. If the inspection is part of a real estate transaction, this documentation is also critical for negotiations. In some cases, drone footage or infrared imagery is included, especially when identifying areas of heat loss or moisture retention.
The report may include an estimate of the remaining lifespan of the roof, based on current wear and material type. In some instances, the inspector may offer a repair plan or refer you to trusted contractors. The clarity and thoroughness of this report are essential for future planning and budgeting. Understanding this step ensures you’re not just told there’s a problem—you’re given the knowledge to address it effectively.
A professional roof inspection offers far more than a glance at shingles—it is a comprehensive process that examines your roofing system from every angle. By understanding what to expect, homeowners can approach inspections with clarity and confidence. From the initial consultation to the final report and follow-up advice, each step is designed to protect your home’s structural integrity and prevent future issues. Whether you’re preparing for seasonal maintenance or considering a roof replacement, the insights gained from a professional inspection provide a solid foundation for informed decision-making and long-term value.